Sunday, 18 March 2012

Lemon Yoghurt Cake - The Weekly Bake Off


It's been a couple of weeks since I took part in the Weekly Bake Off, I have still been baking but I haven't really fancied the bakes, and know they would probably go to waste in my household also.

I made the Lemon Yoghurt Cake quite early in the week this time, rather than leaving it until the weekend as I usually do. This is because I'm going away this weekend.

The only thing I needed to buy to make this cake was Greek yoghurt as I had everything else in. Simple enough and made it relatively cheap to make too! Plus I had a few lemons that really needed using too so that was handy.

This cake calls for 300g of sugar! That's a lot of sugar best brush my teeth after every piece.


This cake takes an hour to bake, I got a little caught up in the TV whilst baking so I forgot to turn it around, and for some reason despite my oven being fairly new and an electric fan heated one it's hotter on one side than the other. So this left me with a bit of a step on my cake. I didn't need to bake it any longer than an hour, the recipe suggests it may take an extra 15 minutes.


This is the first attempt at icing the cake. It all just ran off or soaked in to the cake (the cake was cold like recommended). 


So I decided to try something different and put the cake back in the tin whipped up some more icing (a little thicker this time) and poured it on to the cake and then put the cake back in the fridge.

This seemed to work a lot better it still dribbled down the side but that kind of looks good.


My mum and stepdad, my boss at work and her boyfriend all really like this cake. It was definitely a success. It brought back memories for me of the cake the old ladies used to give me when I was little, they always used to have this cake and marble cake for me to eat (my mum was a residential warden so that meant I grew up around about 100+ old people up to the age of 18).

We ate this with a cup of tea on the train up to Scotland, with the lowland views out of the window it was just perfect.


Friday, 16 March 2012

Mealspiration - Things I've made this week

A few bloggers do round ups of the food they have eaten over the last week, some bloggers even post every single day what they have eaten.. I don't have enough time to do that and I'm sure it would get quite repetitive and boring if I did. I have my favourites that I eat quite a bit and I also have lazy days too where I buy something simple that can just be shoved in the oven.

What I do like about these round ups is the inspiration it gives to others. I've had a few good meals this week, rather than write up about all of them individually and publish each recipe I've decided to group them all in just one post. Plus they are all pretty simple meals.

So what have I eaten this week?

Those of you who follow me on twitter or instagram may already know but those of you who don't here is the run down of the meals I've eaten this week.

Sunday...

Cottage Pie Potatoes.


Basically you pop your jacket potatoes in the oven get them nice and crispy, cut them in half and scrape out the potato. Make the scraped out potato in to mash and pack the skins with cottage pie mix and top with the potato and cheese too if you like it that way. If you don't already have your favourite cottage pie (or even shepherds pie recipe) just google the recipe they are all pretty similar and easy to do!

Here's a picture of one chopped in half.


Monday...

Chicken kebabs with roast veg pasta.

Roast your veg in the oven, we had butternut squash, courgette, and peppers cover in olive oil and pesto. When done mix together with your pasta. Keep it in a pan and put it at the bottom of the oven to keep warm. In the meantime put lemon juice and pesto in a dish and rub it in to your chicken. Put the chicken and tomatoes on skewers and grill. Really cheap and really tasty.

Tuesday...

Spanish Chicken Bake

All you have here is chicken thighs, chorizo, baby potatoes cut in half, red onion. Drizzle olive oil on the chicken and potatoes grate orange zest over the top and sprinkle on some oregano. Then bake in the oven for an hour. Amazingly tasty a bit of a treat.

For the rest of the week I have indulged. Wednesday I went out for a curry and the rest of the weekend is being spent with family where they will be treating me to all sorts of waist band stretching delights.

Hope this gave some people inspiration for their future meals!

Thursday, 15 March 2012

Swiss Roll - Roly Poly Cake


The Swiss Roll otherwise known in my household as Roly Poly Cake is a baking basic. This was one of the first things I was taught how to bake at high school (not ever I began baking way before the age of 11). It is also one of the things I haven't baked since school, I love Swiss roll so I'm not 100% sure why I haven't baked it for so long. Perhaps it's the temptation of buying it pre-rolled from the supermarket as it is the cheapest cake you can buy from the supermarket, and as a skint student I admit I bought that 12p chocolate Swiss roll from Tesco.

Most Swiss roll recipes are similar, as I hadn't baked it for such a long time I decided to use the recipe in Mary Berry's 100 cakes and bakes, this book is proving great in grasping the basics. Most other books I find want to show you new cakes and bakes or improved cakes and bakes or simply their take on traditional cakes and bakes, this is great but sometimes you just need to go back to basics. Anyway... I'm going off on a tangent.

I did a bit 'research' before I attempted this bake and looked at how other recipes deviate, and also watched some videos of people rolling their cake in order to get the best possible result.

The sponge is really simple to make and takes no time to bake. I tipped it on to a baking sheet cover in caster sugar and let it cool a bit. It was lovely and 'spongey' when it came out and I trimmed it down to make a neat rectangle. I then rolled the cake whilst it was still fairly warm using the baking paper as an aid and left it to cool further. Once cooled I carefully unrolled the cake and spread on the jam, once the jam was spread evenly I quickly rolled it back up again and left it for an hour before taking of the baking paper.

Once ready I placed it on my cake plate and sprinkled with more caster sugar.

Et Voila!


The cake was really tasteful with a good bite to it. The raspberry jam I used was a good choice, Marks and Spencers special. The other half wants me to make a chocolate and cream roly poly next.


Wednesday, 14 March 2012

Not so pink Battenburg

I will start this post by saying that me and marzipan do not get on as well as I hoped we would.

I love battenburg, it's a lovely little treat with a cup of tea on a lazy Sunday afternoon. I have always bought Mr Kipplings Battenburg, often buying the mini ones too. I had high expectations for this bake as both me and the other half love it so much.

I used Mary Berry's recipe from 100 cakes and bakes and also looked to The Great British Bake Off book for handy tips too (something Mary Berry's book often lacks).

I went out and purposely bought some baking parchment so I could utilise it's stiffness in creating a divide in my tin. I bought the roll out Marzipan and some red food dye...

All was going well, I had measured out my mixture using a set of scales to ensure that exactly half was in each side, and started to drop in the red food dye to one half. This is when it first started to go wrong. It didn't seem to be going very red, it definitely said 'red food colouring' on the side of my morrisons own pot, but it just seemed to be going brown fearing that the mixture was becoming too wet I left it and thought maybe the colour will come out once it's baked...


I waited with baited breath and when the timer went I lifted it out of the oven and let it cool.

When it came to tipping it out of the tin I could tell that no way in hell was this going to be pink. Never mind I thought, it doesn't have to pink I shall just continue.

I trimmed down my cake and cut it in to four pieces... not as easy as it sounds, my cake began to break a little here and there as I handled it, the spreading of the jam was not helping either.

Then came the worst part. The marzipan. I have worked very little with marzipan so forgive my ameteurness. I sprinkled some flour down on my surface and started to roll it out. It started to stick to my rolling pin, so I sprinkled some flour on there too. I continued to roll. It began to stretch out and just break still sticking to my rolling pin despite copious amounts of flour been added. I got annoyed, why wont you just roll!?! I smacked it around a bit (later finding out that you need to give it a bit of knead before you start playing with it) and it seemed to get the message, I meant business. After a few tantrums it began to do what I wanted it to.

Now came the tricky part, wrapping it around the cake. This wasn't so bad, but would have been better if my cake sticks weren't breaking in half. I wrapped it up trimmed up the edges a bit and dusted the top.

For some reason after a little rest the cake pieces decided they no longer wanted to sit in a neat little square and started to stray from each other.

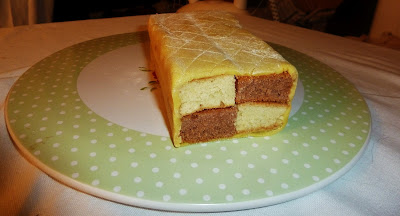
Here is my not so pink battenburg, and not so neat either.


I did have a piece or two but found that the mixture was quite bitty and not as Mr Kipling like as I had hoped. It may be a while until I try to make battenburg again, due to my trauma with the marzipan, but when I do I won't be using that food colouring again and I think I may have to source another recipe (Sorry Mary Berry!).

Monday, 5 March 2012

Fruit Scones


Scones, a staple for any cream tea. I first made scones when I was at school when I was 11 or 12 years old. After learning the basics we were then taught how to make healthy scones... years later and I still make scones but not in the same way as I was taught at school. I no longer use cream of tartar or bicarbonate of soda as I think the scones can some times taste, well, like soda? So now I use self raising flour and baking powder making a much more cakey scone.

When I make scones I tend to make them by eye, what I mean by this is I know exactly how the consistencies should be so I add flour, butter etc until I get that consistency. You don't need any fancy equipment to make scones I tend to use my hands for most of it.

Ingredients:

230g self raising flour (plus a little more for dusting)
1tsp baking powder
60g butter
50g caster sugar
25g glacé cherries (about 4)
25g sultanas
1 large egg
75ml of milk (approx)

- Pre-heat your oven to 180 degrees if fan assisted, check your manuals (or google) for other conversions.

- Sieve your flour and baking powder in to a bowl, add softened butter (if not soft enough cut in to small pieces and add that) and rub the butter in to the flour until all the butter has been rubbed in and the mixture is like fine breadcrumbs. (It's always good to add less flour and then top it up if needed be later).

- Then mix in your sugar, my hands have already been in the bowl so I do this with my hands too ensuring its evenly spread through the mixture.

-Then add in your cherries and sultanas, or just sultanas if you prefer, I like to chop up my cherries too.

- Whisk your egg in a measuring cup until little bubbles start to form on the top, then top up your egg to 150ml with the milk and whisk a little more (just use a manual hand whisk).

- Then add your eggy milk to your dry mixture and start to knead in to a ball. Try not to handle the mixture too much, if it's a bit sticky add some more flour but you don't want it to get too dry.

- Dust down a surface with flour and knead out your dough with your hands. Take a large cutter and begin to cut out your scones. Depending how big you like your scones depends how thickly you should cut. Mine were about 1-1.5cm thick and I got 8 scones from the mixture.

*Tip when your running out of dough stick the off bits in to the cutter and shape in to the cutter to make another scone.

- Put your scones on a greased baking sheet making sure there is at least 2cm between each scone. Then brush some milk on the tops of them.


- Place your scones in the centre of the oven for 10-15 minutes until slightly browning,

- To keep your scones moisture wrap them up in cloth, I used a tea towel. I left them for about 5 minutes before I had one, they were lovely and warm and the butter simply melted in to them. Great with raspberry jam!

Putting the scones to bed. 


Shortly after making my scones I started to notice that quite a lot of other people were making scones too! I know why some of them were now too... due to Tea Time Treats! So even though it was unintended I am going to submit my efforts to this blogger challenge too. 

Tea Time Treats is a baking challenge hosted by two lovely bloggers Lavender and Lovage and What Katie Baked This month the host is Lavender and Lovage.